
Drawing a heart with flowers
"In this article, you will learn how to draw heart-shaped designs with flowers, which will assist you in creating your embroidery masterpiece.
10/25/2023

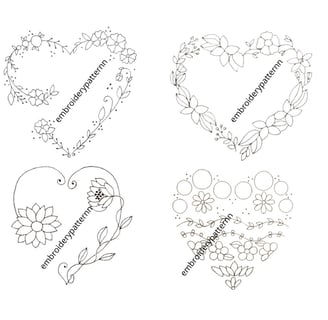
Drawing heart with flowers
Drawing a heart shape with flowers is a creative and artistic endeavor. Here's a step-by-step guide to help you create a heart shape using flowers:
Materials you'll need:
Sketchbook or drawing paper
Pencils and erasers
Colored pencils, markers, or watercolors (for coloring the flowers)
Reference images of flowers (for inspiration)
Step 1: Sketch the Heart Shape
Start by sketching the outline of a heart shape on your paper. You can make it as large or small as you'd like. You can draw a symmetrical heart or a more freeform, hand-drawn heart for a natural look.
Step 2: Choose Your Flowers
Select the types of flowers you'd like to use in your drawing. Common choices for flower hearts include roses, daisies, tulips, and various other colorful blooms. Look at reference images of these flowers to get an idea of their shapes and petal arrangements.
Step 3: Draw the Flowers
Begin drawing the flowers inside the heart shape. Start with the larger flowers and place them strategically along the heart's border. Draw the basic shapes of the flowers, including their petals and centers. Make sure the flowers follow the curvature of the heart.
Step 4: Add Details
Add more details to the flowers by drawing the petals and leaves with attention to their shapes and textures. Use different types of flowers to create a variety of colors and shapes within the heart. You can also include flower buds and greenery to fill in the spaces.
Step 5: Color Your Drawing
Once you've finished drawing the flowers and their details, it's time to add color. Use colored pencils, markers, or watercolors to bring your heart of flowers to life. Consider using a wide range of colors to make your drawing vibrant and visually appealing.
Step 6: Shading and Highlights
To add depth and dimension to your drawing, add shading and highlights. This will make your flowers look more three-dimensional. Shade the areas where the petals overlap and add highlights to the parts of the flowers that catch the light.
Step 7: Background (Optional)
If you want, you can create a background for your flower heart. It could be a simple backdrop or a natural setting like a garden or a field. The choice of the background can enhance the overall composition of your artwork.
Step 8: Final Touches
Review your drawing and make any final adjustments. Add any additional details or textures to the flowers and leaves, and ensure that the heart shape is well-defined. Erase any unnecessary pencil marks, and your heart of flowers is complete.
Remember, drawing is a creative process, so don't be afraid to experiment and make your flower heart unique. Your artistic interpretation and choice of colors can make it a one-of-a-kind creation
."Get inspired to embroider heart-shaped floral designs. It's a delightful and creative craft to try!"