Celebrating Halloween: Quick Embroidery Preparations for Crafters
Get ready for Halloween with quick and easy embroidery projects! In this blog, discover how to create festive designs, including the charming "Ghost and the Mystic Pumpkins." With just a few days left, we’ll guide you through materials, techniques, and display ideas to add a spooky touch to your home. Download the pattern and unleash your creativity this Halloween!
10/24/20242 min read
As Halloween approaches, the excitement in the air is palpable. For avid embroiderers, this season offers a fantastic opportunity to showcase creativity through festive designs. With just a few days left until the spooky celebration, here’s how you can prepare to bring some Halloween spirit into your home with quick and easy embroidery projects.
1. Planning Your Designs
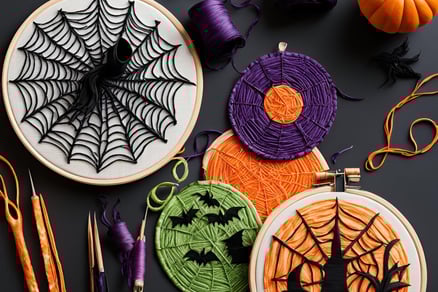
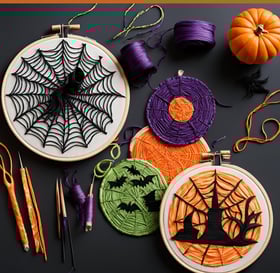
Start by gathering inspiration for Halloween-themed embroidery. Classic motifs include ghosts, pumpkins, bats, and witches. One of my favorite designs that you can quickly execute is "The Ghost and the Mystic Pumpkins." This charming design blends whimsy with spookiness, making it perfect for Halloween décor.
2. Materials Needed
Before diving into your embroidery, make sure you have the following materials on hand:
- Fabric: Choose a sturdy cotton or linen in colors like black, orange, or purple for that Halloween vibe.
- Embroidery Floss: Stock up on bright colors such as orange, green, and white.
- Embroidery Hoop: A 6-inch hoop works well for small projects.
- Needles: Use sharp embroidery needles for easy stitching.
- Scissors: A small pair of embroidery scissors will help you achieve clean cuts.
3. Easy Embroidery Techniques
If you’re short on time, focus on simple stitches that can be completed quickly. Here are a few techniques to consider:
- Back Stitch: Perfect for outlining shapes, giving a clean and defined look.
- Satin Stitch: Great for filling in larger areas, like the body of a ghost or the surface of a pumpkin.
- French Knots: These add a fun texture to your designs, ideal for creating eyes or embellishments.
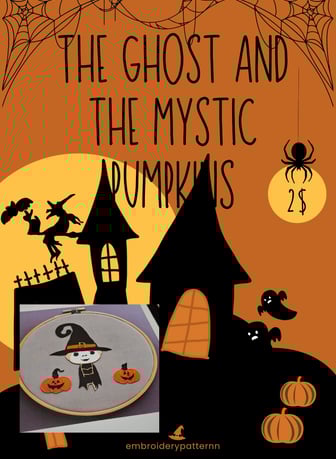
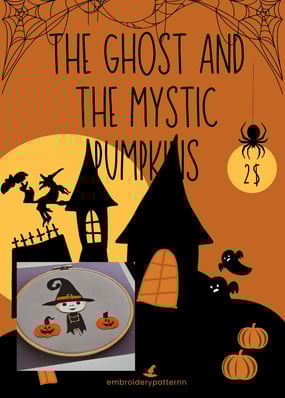
4. The Ghost and the Mystic Pumpkins Design
To make your Halloween celebrations even more special, consider using
"The Ghost and the Mystic Pumpkins" design. You can download the pattern by clicking
on the button below. Here’s a brief description of how to execute this delightful
motif:
- Outline the Ghost: Start with a back stitch to outline the ghost, using white or light gray floss.
- Pumpkins: For the pumpkins, use orange floss for the bodies and green for the stems.
A satin stitch will give them a beautiful finish.
- Facial Features: Add charming facial features to your ghost and pumpkins using black flos for a spooky yet cute effect.
Download "The Ghost and the Mystic Pumpkins" design here!
5. Displaying Your Work
Once you’ve finished your embroidery, think about how you want to display it:
- Wall Hangings: Frame your finished piece in a simple black or orange frame and hang it on your wall.
- Banners: Stitch several designs together to create a festive Halloween banner.
- Table Decorations: Place your embroidered pieces on tables as part of your Halloween décor.
6. Share Your Creations
Don’t forget to share your completed projects on social media! Use hashtags like #HalloweenEmbroidery, #SpookyStitching, and #EmbroideryDesign to connect with fellow crafters and get inspired by others.
Conclusion
With just a few days left before Halloween, it’s the perfect time to dive into some quick and delightful embroidery projects. Whether you choose to create "The Ghost and the Mystic Pumpkins" or other spooky designs, remember that the joy of crafting is in the process. Happy stitching, and may your Halloween be filled with creativity and fun!
www.designet.shop